.png)


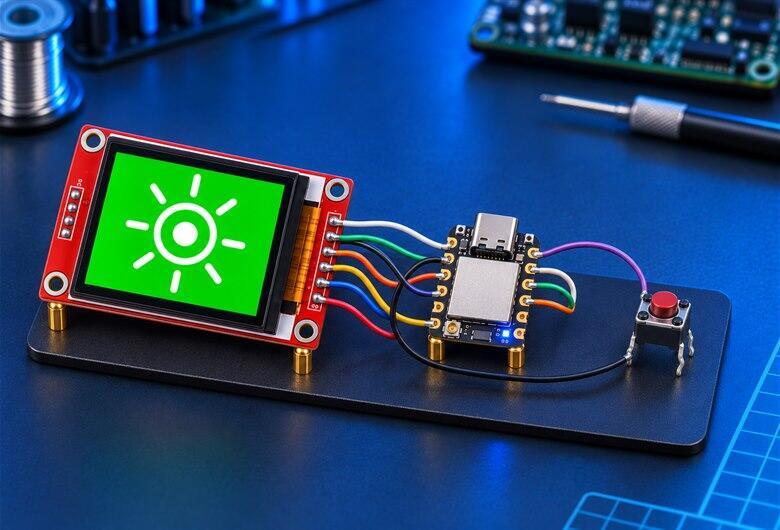
In this project, we will build a mini reaction time game using a XIAO ESP32-C6 development board, a 1.8-inch SPI TFT display and a push button. When the display turns green and shows the word “PRESS!”, the player must press the button as quickly as possible. The reaction time will then be displayed in milliseconds.
This project is a fun introduction to SPI communication, TFT display control, push-button input, random timing and measuring elapsed time with the millis() function.
How Does the Reaction Game Work?
- The display shows a “Press the button to start” message.
- The player presses the button to start a new game.
- The display shows a “Get ready...” message.
- The system waits for a random period between 2 and 5 seconds.
- The display turns green and shows “PRESS!”.
- The time taken for the player to press the button is measured.
- After five rounds, the best and average reaction times are displayed.
If the player presses the button before the display turns green, a “Too early!” warning appears. The current round is restarted and the early press is not added to the score.
247 ms
VERY GOOD!
Required Components
- 1 × XIAO ESP32-C6 Development Board
- 1 × 1.8″ 128×160 SPI TFT LCD Display
- 1 × 6×6 mm Momentary Tactile Push Button
- Breadboard
- Male-to-male jumper wires
- USB Type-C data cable
About the TFT Display
The 1.8-inch TFT display used in this project has a resolution of 128×160 pixels and uses the ST7735R display controller. Display data is sent from the XIAO ESP32-C6 to the screen through SPI communication.
This display is not touch-sensitive. A separate physical push button is therefore used as the player's input.
Important TFT Display Pins
- VCC: Power input for the display.
- GND: Common ground connection.
- SCK or CLK: SPI clock signal.
- SDA or MOSI: Carries display data from the XIAO to the TFT.
- CS: Selects the TFT on the SPI bus.
- DC or A0: Distinguishes commands from display data.
- RST or RESET: Resets the display controller.
- LED or BL: Powers the display backlight.
Connecting the TFT Display to the XIAO ESP32-C6
Disconnect the XIAO ESP32-C6 from the USB cable before making any connections. Recheck every wire before powering the circuit.
| TFT display pin | XIAO ESP32-C6 pin | Purpose |
|---|---|---|
| VCC | 3V3 | Display power |
| GND | GND | Common ground |
| SCK / CLK | D8 | SPI clock signal |
| SDA / MOSI | D10 | Sends data from the XIAO to the display |
| CS | D3 | Selects the TFT display |
| DC / A0 | D2 | Distinguishes commands from display data |
| RST / RESET | D1 | Resets the display |
| LED / BL | 3V3 | Powers the backlight |
The TFT display only receives image data in this project, so an MISO connection is not required. The XIAO ESP32-C6 hardware SPI pins are D8 for SCK, D9 for MISO and D10 for MOSI.
Push-Button Connection
| Button connection | XIAO ESP32-C6 pin |
|---|---|
| One side of the button | D0 |
| Opposite side of the button | GND |
Pin D0 will be configured as INPUT_PULLUP. This activates the internal pull-up resistor of the XIAO ESP32-C6, so an external pull-up resistor is not required. The pin reads HIGH when the button is released and LOW when it is pressed.
Installing Arduino IDE
1. Install Arduino IDE
Download and install the current stable version of Arduino IDE. Open Arduino IDE after the installation is complete.
2. Add the ESP32 Board Manager URL
Open File > Preferences in Arduino IDE. Add the following address to the “Additional Boards Manager URLs” field:
https://espressif.github.io/arduino-esp32/package_esp32_index.json3. Install the ESP32 Board Package
- Open Tools > Board > Boards Manager.
- Enter esp32 in the search field.
- Install the ESP32 package provided by Espressif Systems.
- Select XIAO_ESP32C6 as the board.
- Select the serial port used by the connected XIAO board.
4. Install the Display Libraries
Open Tools > Manage Libraries and install the following libraries:
- Adafruit GFX Library
- Adafruit ST7735 and ST7789 Library
If Arduino IDE asks to install additional dependencies, select Install All.
Mini Reaction Game Arduino Code
Copy the following code into Arduino IDE. Check the selected board and port, and then click the Upload button.
#include <Adafruit_GFX.h>
#include <Adafruit_ST7735.h>
#include <SPI.h>
#include <esp_system.h>
#include <limits.h>

// TFT display connections
#define TFT_CS   D3
#define TFT_DC   D2
#define TFT_RST  D1

// Reaction button
#define BUTTON_PIN D0

// Game settings
const uint8_t TOTAL_ROUNDS = 5;
const unsigned long MIN_WAIT_TIME = 2000;
const unsigned long MAX_WAIT_TIME = 5000;

// Create the TFT display object
Adafruit_ST7735 tft = Adafruit_ST7735(TFT_CS, TFT_DC, TFT_RST);

// Possible game states
enum GameState {
  START_SCREEN,
  WAITING,
  GO_SIGNAL,
  ROUND_RESULT,
  EARLY_PRESS,
  GAME_FINISHED
};

GameState gameState = START_SCREEN;

unsigned long stateStartedAt = 0;
unsigned long randomWaitTime = 0;
unsigned long goStartedAt = 0;
unsigned long reactionTime = 0;
unsigned long totalReactionTime = 0;
unsigned long bestReactionTime = ULONG_MAX;

uint8_t currentRound = 1;

// Draw text in the horizontal center of the display
void drawCenteredText(
  const String &text,
  int16_t y,
  uint8_t textSize,
  uint16_t color
) {
  int16_t x1;
  int16_t y1;
  uint16_t textWidth;
  uint16_t textHeight;

  tft.setTextSize(textSize);
  tft.setTextColor(color);
  tft.setTextWrap(false);

  tft.getTextBounds(
    text.c_str(),
    0,
    y,
    &x1,
    &y1,
    &textWidth,
    &textHeight
  );

  int16_t x = (tft.width() - textWidth) / 2;
  tft.setCursor(x, y);
  tft.print(text);
}

// Detect a button press and filter switch bounce
bool buttonPressed() {
  static int lastReading = HIGH;
  static int stableState = HIGH;
  static unsigned long lastChangeTime = 0;

  int currentReading = digitalRead(BUTTON_PIN);

  if (currentReading != lastReading) {
    lastReading = currentReading;
    lastChangeTime = millis();
  }

  if (
    millis() - lastChangeTime > 25 &&
    currentReading != stableState
  ) {
    stableState = currentReading;

    if (stableState == LOW) {
      return true;
    }
  }

  return false;
}

void showStartScreen() {
  tft.fillScreen(ST77XX_BLUE);

  drawCenteredText("MINI REACTION", 22, 2, ST77XX_WHITE);
  drawCenteredText("GAME", 45, 2, ST77XX_WHITE);

  drawCenteredText(
    "Press the button",
    81,
    1,
    ST77XX_YELLOW
  );

  drawCenteredText(
    "to start",
    96,
    1,
    ST77XX_YELLOW
  );
}

void showWaitingScreen() {
  tft.fillScreen(ST77XX_YELLOW);

  drawCenteredText("GET READY...", 42, 2, ST77XX_BLACK);

  drawCenteredText(
    "Round " + String(currentRound) + "/" + String(TOTAL_ROUNDS),
    78,
    1,
    ST77XX_BLACK
  );
}

void showGoScreen() {
  tft.fillScreen(ST77XX_GREEN);
  drawCenteredText("PRESS!", 38, 3, ST77XX_BLACK);
}

void showEarlyPressScreen() {
  tft.fillScreen(ST77XX_RED);

  drawCenteredText("TOO EARLY!", 32, 2, ST77XX_WHITE);
  drawCenteredText("Wait for green", 70, 1, ST77XX_WHITE);
  drawCenteredText("Round will restart", 88, 1, ST77XX_WHITE);
}

void showRoundResult() {
  tft.fillScreen(ST77XX_BLACK);

  drawCenteredText("REACTION TIME", 16, 2, ST77XX_CYAN);

  drawCenteredText(
    String(reactionTime) + " ms",
    50,
    3,
    ST77XX_WHITE
  );

  String message;

  if (reactionTime < 200) {
    message = "INCREDIBLE!";
  } else if (reactionTime < 300) {
    message = "VERY GOOD!";
  } else if (reactionTime < 450) {
    message = "GOOD!";
  } else {
    message = "GO FASTER!";
  }

  drawCenteredText(message, 91, 1, ST77XX_YELLOW);
}

void showFinalScreen() {
  unsigned long averageTime =
    totalReactionTime / TOTAL_ROUNDS;

  tft.fillScreen(ST77XX_MAGENTA);

  drawCenteredText("GAME OVER", 9, 2, ST77XX_WHITE);

  drawCenteredText(
    "Best: " + String(bestReactionTime) + " ms",
    45,
    1,
    ST77XX_WHITE
  );

  drawCenteredText(
    "Average: " + String(averageTime) + " ms",
    63,
    1,
    ST77XX_WHITE
  );

  drawCenteredText(
    "Press the button",
    91,
    1,
    ST77XX_YELLOW
  );

  drawCenteredText(
    "to play again",
    106,
    1,
    ST77XX_YELLOW
  );
}

// Begin the random waiting stage
void beginWaiting() {
  randomWaitTime = random(
    MIN_WAIT_TIME,
    MAX_WAIT_TIME + 1
  );

  showWaitingScreen();

  stateStartedAt = millis();
  gameState = WAITING;
}

// Reset all scores and start a new game
void startNewGame() {
  currentRound = 1;
  totalReactionTime = 0;
  bestReactionTime = ULONG_MAX;

  beginWaiting();
}

void setup() {
  pinMode(BUTTON_PIN, INPUT_PULLUP);

  // Use the ESP32 hardware random number generator
  randomSeed(esp_random());

  // XIAO ESP32-C6 hardware SPI pins
  SPI.begin(D8, D9, D10, TFT_CS);

  // Initialize the ST7735R display
  tft.initR(INITR_BLACKTAB);
  tft.setRotation(1);

  showStartScreen();
}

void loop() {
  bool pressed = buttonPressed();

  switch (gameState) {

    case START_SCREEN:
      if (pressed) {
        startNewGame();
      }
      break;

    case WAITING:
      // The player pressed before the green screen
      if (pressed) {
        showEarlyPressScreen();
        stateStartedAt = millis();
        gameState = EARLY_PRESS;
      }
      // The random waiting period has finished
      else if (millis() - stateStartedAt >= randomWaitTime) {
        showGoScreen();

        // Record the moment the green screen appears
        goStartedAt = millis();
        gameState = GO_SIGNAL;
      }
      break;

    case GO_SIGNAL:
      if (pressed) {
        reactionTime = millis() - goStartedAt;
        totalReactionTime += reactionTime;

        if (reactionTime < bestReactionTime) {
          bestReactionTime = reactionTime;
        }

        showRoundResult();
        stateStartedAt = millis();
        gameState = ROUND_RESULT;
      }
      break;

    case ROUND_RESULT:
      // Keep the result on the screen for 2.5 seconds
      if (millis() - stateStartedAt >= 2500) {

        if (currentRound >= TOTAL_ROUNDS) {
          showFinalScreen();
          gameState = GAME_FINISHED;
        } else {
          currentRound++;
          beginWaiting();
        }
      }
      break;

    case EARLY_PRESS:
      // Repeat the same round after an early press
      if (millis() - stateStartedAt >= 2000) {
        beginWaiting();
      }
      break;

    case GAME_FINISHED:
      if (pressed) {
        startNewGame();
      }
      break;
  }
}
How Does the Code Work?
Defining the SPI Display Connections
#define TFT_CS   D3
#define TFT_DC   D2
#define TFT_RST  D1
These lines tell the program which XIAO pins are connected to the CS, DC and RESET pins of the TFT display.
Using the Button with the Internal Pull-up Resistor
pinMode(BUTTON_PIN, INPUT_PULLUP);This line activates the XIAO's internal pull-up resistor. The D0 pin therefore reads LOW when the button is pressed.
Generating a Random Waiting Time
randomWaitTime = random(2000, 5001);A different waiting time between 2000 and 5000 milliseconds is created for each round. This prevents the player from predicting when the display will turn green.
Measuring the Reaction Time
goStartedAt = millis();
reactionTime = millis() - goStartedAt;
The starting time is recorded when the green screen appears. When the player presses the button, the saved starting time is subtracted from the current time to calculate the reaction time.
Why Does the Program Not Use delay()?
If a long delay() were used, the XIAO would not be able to check the button while waiting. Using millis() allows the program to continue checking for an early button press during the random waiting period.
Running the Game
- Recheck all circuit connections.
- Connect the XIAO ESP32-C6 to the computer using a data-capable USB cable.
- Select the XIAO ESP32-C6 board and the correct port in Arduino IDE.
- Upload the program to the board.
- Press the button when the start message appears.
- Wait while the display shows “Get ready...”.
- Press the button as soon as the display turns green.
Troubleshooting
The Display Remains Completely White
- Check the CS, DC and RESET connections.
- Make sure SCK is connected to D8.
- Make sure SDA/MOSI is connected to D10.
- Check that the display and XIAO share the same GND connection.
The Display Backlight Does Not Turn On
Check the LED or BL pin on the TFT module. If this pin is not powered, the display may be producing an image even though the backlight remains off.
The Display Colors Are Incorrect
Some ST7735 display versions require a different initialization setting. Replace:
tft.initR(INITR_BLACKTAB);with one of the following options:
tft.initR(INITR_GREENTAB);
// or
tft.initR(INITR_REDTAB);
The Image Is Rotated or Upside Down
Change the value in the following line to 0, 1, 2 or 3:
tft.setRotation(1);The Button Appears to Be Permanently Pressed
The two wires may be connected to pins on the same side of a four-pin tactile button. Connect D0 and GND to pins on opposite sides of the button.
Ideas for Improving the Project
- Add a buzzer that produces a sound when the display turns green.
- Create easy, normal and difficult game modes.
- Save the best score permanently in the ESP32 memory.
- Add a second button to create a two-player reaction game.
- Display different shapes or colors in each round.
- Use the wireless features of the XIAO ESP32-C6 to display scores on a web page.
- Add a LiPo battery and power switch to create a portable game.
Conclusion
In this project, we controlled an ST7735R-based SPI TFT display with the XIAO ESP32-C6, read input from a physical push button and measured the player's reaction time in milliseconds. We also used random number generation, button debouncing and non-blocking timing with millis().